The best chocolate cookies EVER… for the Cookie Monster in all of us!

“C is for Cookie, that’s good enough for me!” 

I know, I know… everyone and their dog claims to be the best, but if the speed at which these cookies disappear in my household is any indication, these cookies probably ARE the best. Super chocolatey, soft, and they just melt in your mouth. They are fabulous with milk, and you can’t eat just one. It’s a proven fact! Store bought cookies? No, thank you. Try this recipe, you’ll see how easy to make and yummy these are!

The Best Chocolate Cookies Ever

Ingredients:

1 1/3 cups of unsalted butter, softened (DO NOT use Crisco. I will find you and take all your Crisco away!)

1 cup granulated sugar

2/3 cup packed brown sugar

1 tbsp. vanilla extract or vanilla sugar

2 eggs, slightly beaten

3 1/4 cups all-purpose flour

2/3 cup of cocoa

1 tsp. baking soda

1 tsp. salt 

1/4 cup milk

1 cup chocolate chips (you can also use chocolate chunks, nuts, M&M’s, etc. I used semi-sweet chocolate chips and white chocolate chunks for these)

Make It:

-preheat oven to 350 F

-combine butter, sugars, and vanilla in large bowl and beat with mixer on low speed until creamy

-add eggs and beat well

-combine flour, cocoa, baking soda and salt and stir until well blended. Add slowly to butter and sugar mixture, alternating with milk. Keep beating until everything is just blended and smooth. Feel the dough, and if too sticky add a bit more flour.

-stir in chocolate chips, or whatever you are using

-shape into balls and place on ungreased cookie sheet. Leave a bit of space between each cookie to allow room for spreading. 

-bake for 10-12 minutes, until just done on the bottom. Cookies will still be soft and moist when they leave the oven, but will firm up as they cool. I will also mention here that they are absolutely delicious warm from the oven. Mmm!

-this recipe makes about 3 dozen cookies if you use about 2 tbsp of dough for each cookie, or about 6 dozen cookies if you use about 1 tbsp of dough for each cookie. They keep well in a covered container (if they last longer than a day!) and the recipe can be easily doubled or tripled if you are planning to feed a crowd, or planning to give up all other food and live on cookies. Which might not be such a bad idea….

Enjoy!!!

Have a sugarrific day!

M xoxo

Cake mix or not? That is the question…

Ah, the same old debate….should I use cake mix or make a cake from scratch? Yeah, yeah, I know, cake mixes are ever so convenient, inexpensive, and pretty much guarantee good results every time, right? That’s what the manufacturers want you to think! When I tell people I make all my desserts from scratch, they tend to stare at me open-mouthed like I just told them I have a pet dinosaur. Oh, people!

Growing up in Europe, I didn’t know what cake mix was until we moved to Canada. My young and naive self thought all cakes were made the “old-fashioned” way; by measuring and mixing ingredients straight from our cupboards and fridge. My mom and Baba always made everything from scratch. Whether it was dinner or dessert, we always knew exactly what was in it. This magical “cake in a box” thing astounded me. I think we tried the boxed mixes a couple of times, and then abandoned the idea because my mom didn’t like the way they tasted, which was pretty much like the box they came in. Yay, let’s all chomp on some cardboard! No, thanks. So, she kept on making all our cakes and desserts from scratch. No wonder all of our friends always looked forward to our birthday parties. I heard the comment “your mom makes the best desserts” on more occasions than I can count. And why not, the woman obviously knows what she’s doing 🙂 The same goes for cookies, cupcakes, pancakes, brownies, etc. To us, there was no such thing as a boxed mix.

As an adult, I think I’ve used boxed cake mix only a couple of times. I really don’t like the taste of it either, and truthfully, it isn’t really all that much work making a cake from scratch. Or I’m so used to it that I don’t notice the amount of work lol Either way, I prefer to know what is in my food, so making things from scratch is the way to go, for me at least. I get so excited about making something delicious (I know I’m a nerd, you just feel free to chuckle at me) that I want to take the time to do it right, and I don’t want to sacrifice quality and taste for convenience. If you don’t have the time to make a cake, then don’t! Although cakes and desserts are not the most healthy of snacks, at least I know that the ones I make were made with fresh ingredients and free of chemicals and preservatives. As a very picky eater, this is important to me. When the mood for cake strikes (which is often!) why should I go all the way to the store to get a mix when I already have everything I need in my cupboards and fridge? It just doesn’t make sense. Plus I hate grocery shopping and avoid the grocery store except when necessary.

Check out the ingredients below. These are from a box of Duncan Hines Classic Yellow Cake Mix:

F: Wheat Starch, Salt, Dextrose, Polyglycerol Esters Of Fatty Acids, Partially Hydrogenated Soybean Oil, Cellulose Gum, Artificial Flavors, Xanthan Gum, Maltodextrin, Modified Cornstarch, Colored Withsugar, Enriched Bleached Wheat Flour (Flour, Niacin, Reduced Iron, Thiamine Mononitrate, Riboflavin, Folic Acid), Vegetable Oil Shortening (Partially Hydrogenated Soybean Oil, Propylene Glycol Mono- And Diesters Of Fats, Monoand Diglycerides), Leavening (Sodium Bicarbonate, Dicalcium Phosphate, Sodium Aluminum Phosphate, Monocalcium Phosphate). Contains 2% Or Less O (Yellow 5 Lake, Red 40 Lake).

Sound delicious? Not so much. Personally, I don’t know what half those words mean.  It sounds like a science experiment. I’m sure I could “Google” them or look them up, but I think it’s probably better not to know. This is just my opinion though; if you like cake mix, then to each his own. But at least we can pronounce “flour”, “sugar”, “milk”, “eggs”….

Have a sugarrific day!

M xoxo

More Scaredy cookies!

image

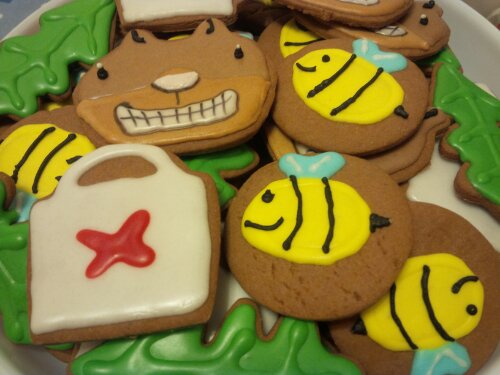
Since Scaredy Squirrel has pretty much taken over our house, I thought it fitting to make more Scaredy cookies. The theme for these is from the original book, which has Scaredy hiding in his oak tree most of the time until he spots a “killer” bee and falls out of the tree, which is when he also discovers that he is a flying squirrel!

The shapes for these chocolate sugar cookies were of course Scaredy, an oak leaf, a “killer” bee and Scaredy’s trusty safety kit. Some cute cookies to go along with a hilarious story equals one very happy five year old 🙂

Easy-Peasy Chocolate Chip Cake

Sometimes you just need some chocolate, and only a cake will do. You know what I’m talking about, ladies. Chocolate cake is comforting in a way that nothing else is. Who cares if it spoils your diet! Besides, we know that true bakers and dessert lovers don’t do diets anyway 🙂

On this particular day, still bouncing off the walls from the amount of holiday goodies I may or may not have consumed in recent weeks, I decided I was tired of chocolates and cookies and wanted some cake. That’s kind of how I roll, I just decide to make a cake when inspiration strikes, or my sweet tooth demands it. I was feeling rather lazy after a long day of shopping and housework, so I decided that simple was best. As in mix and bake in one pan, resulting in minimal clean-up. Genius! I literally had one fork, the pan, and one measuring cup to wash. Yay!

I doubled this recipe and used a 9×13 pan, but it would work in a smaller pan also if you want to use the single recipe.

Ingredients:

1/2 cup oil

2 squares unsweetened baking chocolate

1 1/3 cups flour

1 cup granulated sugar

3/4 cup of warm water

1/2 tsp baking soda

1/2 salt

1 egg

1 pkg semi-sweet chocolate chips

Make It: 

-Preheat oven to 350 F. 

-Place oil and unsweetened chocolate in pan and put in oven for about 4 minutes, until chocolate is melted. Stir to combine oil with chocolate.

-Add the remaining ingredients and stir with a fork until well blended. You want a nice smooth mixture without any clumps of flour or sugar. 

-Stir in half of the package of chocolate chips, and then sprinkle remaining chocolate chips on top. 

-Bake for 30-35 minutes, or until toothpick inserted in center comes out clean. If you want a gooey, fudgy consistency in the middle you can bake for a little less time, however, you don’t want it to be too under-done or you’ll just have a gooey mess.

When the cake is baked, allow it to cool and then cut into squares. I also added an icing drizzle to mine to make it pretty, but you can leave that out or top it with something else. This is so easy and yummy, and the best part is there is no big mess to clean up! Try it yourself, and you’ll be doing your own  sugar-induced happy dance in no time!

Have a sugarrific day!

M xoxo

Empire Cookies: Biscuits fit for the Queen!

I don’t know one person who doesn’t like Empire Cookies, or Empire Biscuits, as they tend to be known in the UK. Not one. They are simple to make, so yummy, and you can’t eat just one. They are typically enjoyed with tea, but I don’t like tea, so I have them with milk. And did I mention I love jam? This is definitely my kind of cookie. 

I made these for a recent family dinner, and although they have jam in the middle like the traditional recipe, I added coloured royal icing and sprinkles to the tops to make them a bit more festive. Traditionally, it is only the white icing and a glace cherry on top, but that’s boring and those cherries are yuck. Plus my little one is obsessed with sprinkles, so I knew she would approve 🙂

This recipe is easily doubled or tripled, and I would recommend this if you’re baking for a crowd. Or if you love cookies. This recipe makes about 24 cut outs, but remember that you’ll have half of the cookies you cut out since they will be a sandwich cookie in the end. Lesson learned; the first time I made these I ended up with 12 cookies and a family fighting over them. Not pretty.

Ingredients for the cookies:

1/2 cup unsalted butter, room temperature

1/2 cup granulated sugar

1 egg

1 tsp vanilla

2 cups flour

1 tsp baking powder

about 1 cup of strawberry or raspberry jam, for the filling

For the icing:

1 cup powdered sugar

1/4 tsp almond extract

1 tbsp hot water

Make it:

-with an electric mixer, cream butter. Add sugar and beat well. Add egg and vanilla, and beat until smooth and creamy

-Combine flour and baking powder, and gradually add to creamed mixture until a dough forms

-Roll out the dough, and cut into rounds. You can use whatever size of round cutter you like. Personally, I like the cookies to be a little bigger than bite-size because you can fit more jam in between 🙂

-Place on ungreased cookie sheets and bake at 350 F for about 10 minutes or until lightly browned

-Once cookies are completely cooled, they are ready to fill and frost. I like to add some jam to a cup and stir around a bit to get a smooth consistency, and then use a piping bag to fill the cookies. This method is much faster and neater than using a spoon. Once filled, top with another cookie.

-For the frosting, just stir together all ingredients and use a spoon or spatula to frost the tops of the cookies. I like my icing a little thicker so it doesn’t run off the sides, or you can use 25 second royal icing to really make sure it stays put. Then you can add sprinkles, sanding sugars, or cherries to the tops to make them pretty, or you can just leave them plain. 

Such a simple and delicious little treat!

Have a sugarrific day!

M xoxo


Rudolph the Red-Nosed……Bunny???

Hope everyone’s holidays were fabulous! We have one more Christmas coming up next week, and then (thankfully) it’s all over and we can get back to normal and not rush around so much.

Although this isn’t my favourite time of year, I’ll take any excuse to make yummy treats for my family. New Year’s Day is no different, as we have a big, cozy, family dinner complete with desserts. This year, I decided to make a reindeer cake. No, I don’t have a reindeer cake pan, so I used the Wilton Easter Bunny pan (hence the title) lol I think it came out pretty well, and everyone thought it was adorable. And of course I will share my recipe with you, my fine followers!

Chocolate Cake with Banana Pudding Filling

Ingredients for Cake:

2 cups all purpose flour

1/2 cup cocoa powder

2 tsp baking powder

2 tsp baking soda

2 cups of water

2 cups sugar

6oz of chopped baking chocolate ( I used unsweetened, but you can use dark or semi-sweet. Make sure it is good quality baking chocolate, not chocolate chips)

6 tbsp unsalted butter

2 tbsp vegetable oil

1 tsp vanilla extract or vanilla sugar

2 large eggs, beaten

Make it:

-Preheat oven to 350 F. Grease your cake pan and set aside 

-Whisk together flour, cocoa powder, baking powder, and baking soda in a bowl and set aside

-In a saucepan, combine water and sugar and bring to a boil, stirring until sugar is dissolved. Remove from heat and add chocolate and butter and stir until melted. 

-Add the oil and vanilla, and then add the eggs quickly while stirring. It’s important to add the eggs quickly so they don’t cook. We want a cake, not scrambled eggs 🙂

-Add dry ingredients and whisk until smooth

-Pour batter into pan and bake for 20-25 mins or until your toothpick or cake tester comes out clean when inserted into the center of the cake. Let the cake cool completely before filling.

Ingredients for Banana Pudding Filling:

1 package banana flavoured cooked pudding/pie filling mix (not instant pudding)

2 cups milk

3/4 cup granulated sugar

1/2 cup unsalted butter, at room temperature

-For this filling, completely ignore the package directions. Instead, pour the pudding mix into a saucepan, and add the milk and sugar. Now get ready to stir. A lot. Cook over medium-low heat and stir constantly, otherwise it will stick to the bottom and burn. Keep stirring until no longer foamy and thickened to a pudding consistency. Once thickened, remove from heat and set aside to cool to room temperature. Stir occasionally to prevent the pudding from getting clumpy as it cools. 

-while waiting for the pudding to cool, whip the butter with the whisk attachment until light and creamy. Then add the cooled pudding mixture and whip until nicely incorporated and smooth.

To assemble the cake, I cut it in half and filled it with the pudding mixture. Since I was using the bunny pan, I cut off the tips of the ears, and attached the pieces to the side of the reindeer’s head, for ears. Then I frosted the entire cake with chocolate whipped cream buttercream and added the facial details and antlers with royal icing. Some chocolate candies added some colour to the antlers and made the cake festive.  

Cute and yummy!

IMG_00000571

Have a sugarrific day!

M xoxo